
Integrate WhatsApp with Salesforce for Smarter Communication
Seamlessly Integrate WhatsApp with Salesforce for Enhanced Communication
In today’s fast-paced business environment, efficient communication is key. Imagine being able to initiate a WhatsApp chat with your leads and contacts directly from Salesforce, without ever having to save their phone numbers. This guide will walk you through the steps to achieve just that, leveraging the WhatsApp API to streamline your communication workflow.
Understanding the Integration’s Power
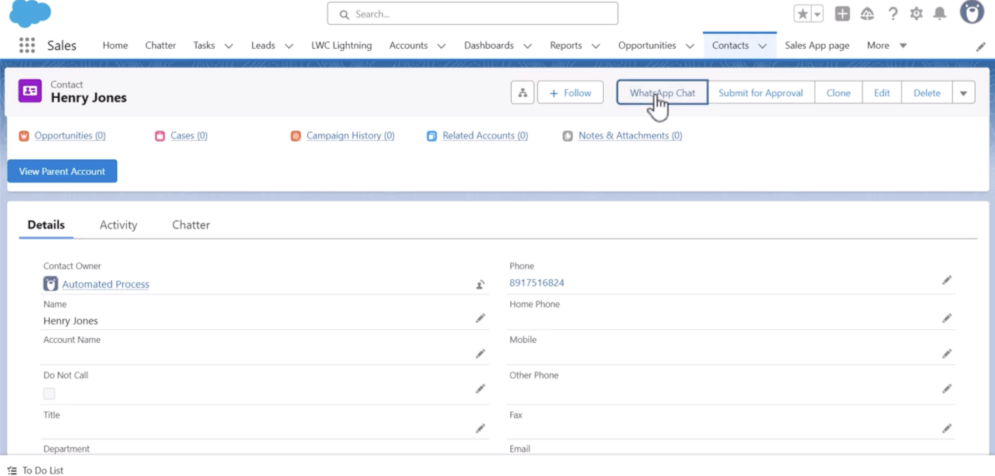
This integration allows you to add a custom “WhatsApp Chat” button to your Salesforce records (like Contacts or Leads). When clicked, this button automatically opens a WhatsApp chat window on your device, pre-populated with a customizable message that can include dynamic information such as the contact’s name. It also intelligently handles cases where a number isn’t registered on WhatsApp, providing a clear error message.
Step-by-Step Integration Process
Follow these instructions to set up the WhatsApp integration in your Salesforce org:
Step 1: Access the Object Manager
- Log in to your Salesforce account.
- Navigate to Setup.
- In the Quick Find box, search for and select Object Manager.
Step 2: Select the Desired Object
- From the Object Manager, choose the standard or custom object where you want to add the WhatsApp chat functionality (e.g., Lead, Contact, Account).
- Important: This object must have a Phone field, as the integration relies on retrieving the phone number from the record.
- Click on the chosen object’s name.
Step 3: Create a New Custom Button
- On the object’s detail page, click on Buttons, Links, and Actions.
- Click the New Button or Link button.
Step 4: Configure Button Details
Fill in the button’s properties as follows:
- Label: Enter a user-friendly label (e.g., “Open WhatsApp Chat” or “WhatsApp Message”).
- Name: This field will auto-populate based on the label.
- Display Type: Select Detail Page Button.
- Behavior: Choose Display in new window.
- Content Source: Select URL.
Once created, remember to add the button to the appropriate Page Layout.
Step 5: Enter the WhatsApp API Formula
This is the core of the integration. In the “Formula Editor” area, paste and customize the following URL formula:
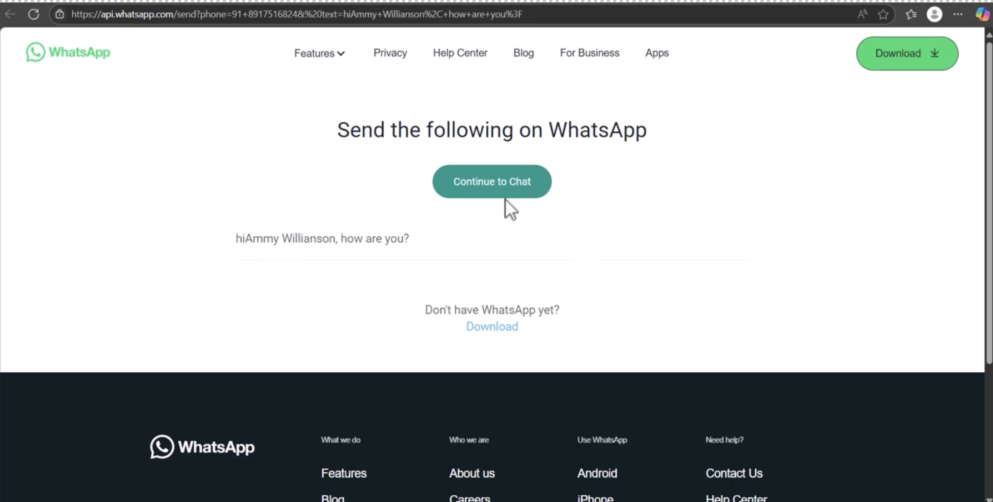
https://api.whatsapp.com/send?phone={!Lead.Phone}&text={!JSENCODE(“Hi ” & Lead.FirstName & “, how are you?”)}
Breakdown of the Formula:
- [https://api.whatsapp.com/send?:](https://api.whatsapp.com/send?`🙂 This is the base WhatsApp API link.
- phone={!Lead.Phone}: This is a merge field that dynamically pulls the phone number from the current Salesforce record.
- Customization: If you are on a Contact object, you would use {!Contact.Phone}. If you are on a custom object My_Custom_Object__c with a phone field Phone__c, you would use {!My_Custom_Object__c.Phone__c}.
- &text={!JSENCODE(“Hi ” & Lead.FirstName & “, how are you?”)}: This part defines the pre-populated message.
- JSENCODE(…): This function is crucial. It encodes the text to ensure it’s properly formatted for a URL, especially when including special characters or spaces.
- “Hi ” & Lead.FirstName & “, how are you?”: This is your customizable message.
- “Hi “: A static string.
- & Lead.FirstName: Another merge field that dynamically inserts the Lead’s first name. Adjust this (e.g., & Contact.Name) based on your object and desired field.
- “, how are you?”: The rest of your static message.
Before saving, click “Check Syntax” to ensure there are no errors in your formula. Finally, click Save.
Conclusion
By following these steps, you can successfully integrate WhatsApp with Salesforce and provide your sales and service teams with a fast, direct, and efficient communication channel. This integration enhances responsiveness, improves customer engagement, and eliminates manual effort—directly from within Salesforce.
No Comments